> ## Documentation Index
> Fetch the complete documentation index at: https://docs.kimp360.com/llms.txt
> Use this file to discover all available pages before exploring further.
# API Authentication
> Learn how to securely authenticate your requests to the KIMP360 API using API keys.
Securely authenticating your requests is the first step to interacting with the KIMP360 API. This guide provides detailed information on how to authenticate using API keys, best practices for key management, and how to troubleshoot common authentication issues.
## Authentication Overview
The KIMP360 API uses API keys to authenticate requests. All API requests must include a valid API key. Requests made without a valid key, or with an improperly formatted key, will result in an authentication error.
What is an API Key? \
An API key is a unique string that the API uses to identify and authorize you (or your application). It’s like a password for your API access, so it’s crucial to keep it secure.
## Obtaining Your API Key
To start making API calls, you first need to obtain an API key:
Sign in to your KIMP360 account. From the sidebar, click **My Account > Settings**, then open the **Zapier Integration** tab. 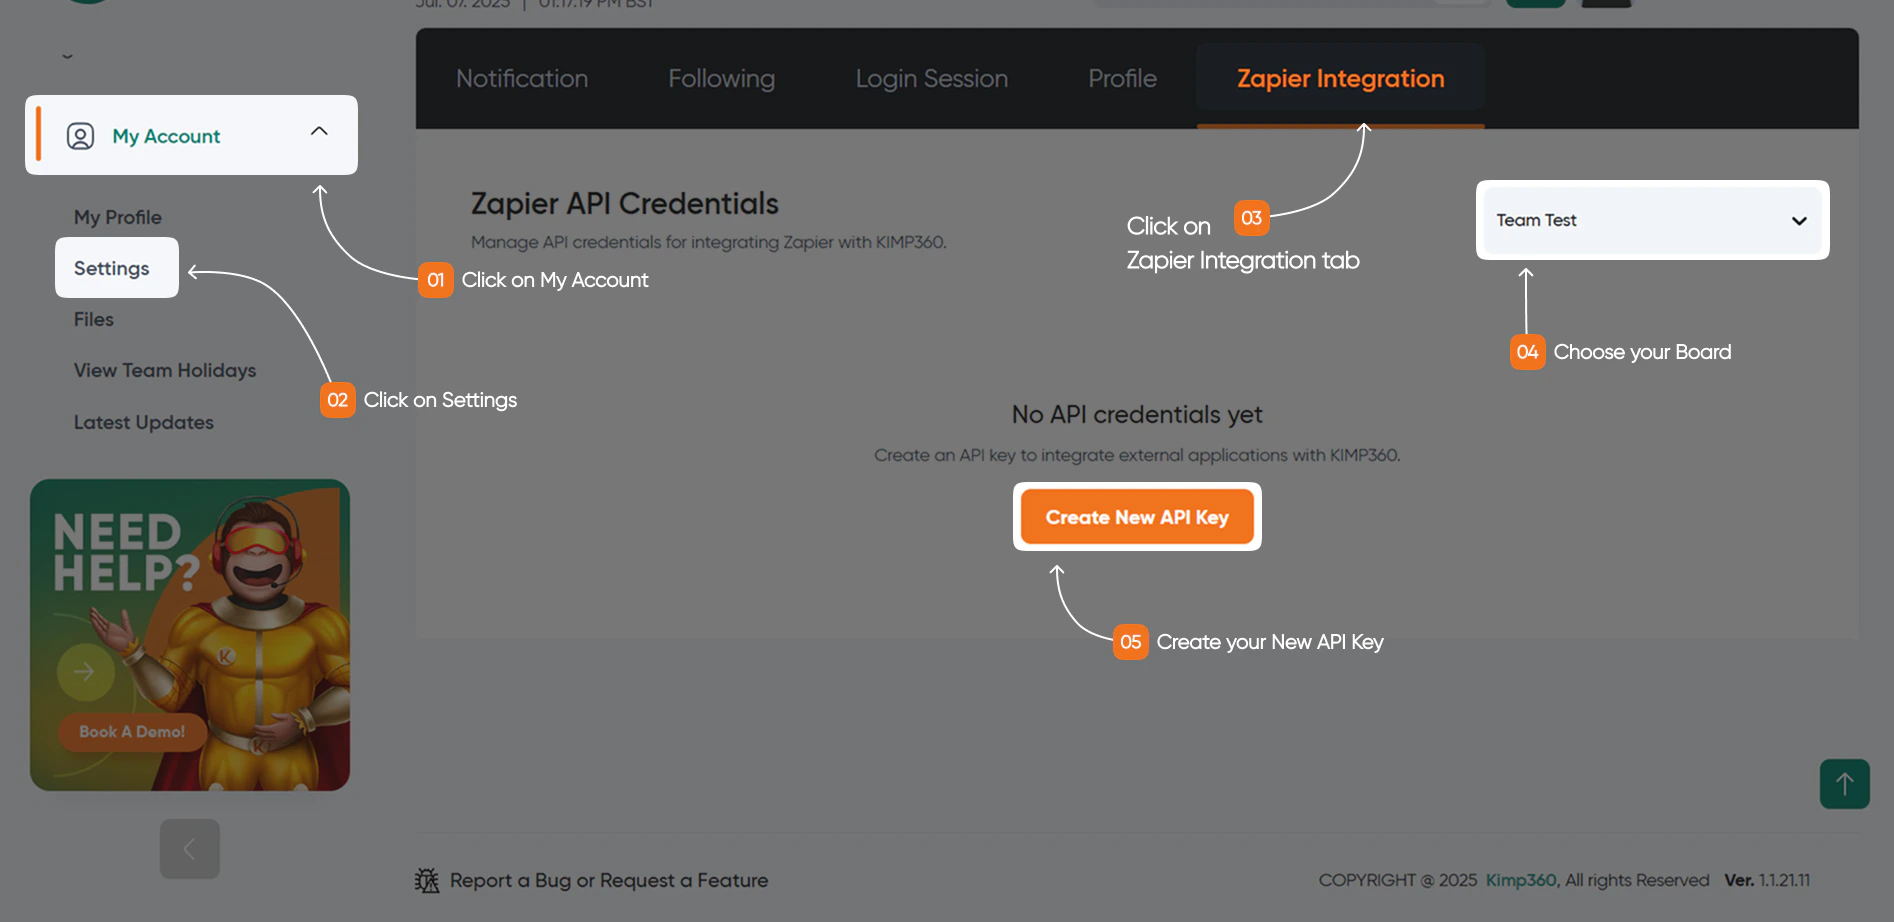 In the **Zapier Integration** tab, you can generate a new API key or view your existing key. If you generate a new key, you may be asked to name it for easy identification (for example, **“KIMP API Key”**).
Once your API key is displayed, copy it and store it in a secure location, such as a password manager or a secure environment variable for your application.
Important: Secure Your Key! \
Your API key grants access to your KIMP360 data and resources. Never share it publicly, embed it directly in client-side code (such as JavaScript in a browser), or commit it to version control (for example, Git).
## Making Authenticated Requests
To authenticate an API request, you must include your API key in the **x-api-key** HTTP header.
**Example Request Header:**
```http theme={null}
x-api-key: YOUR_API_KEY
```
Replace `YOUR_API_KEY` with the actual API key you obtained.
**Full Example using cURL:**
```bash theme={null}
curl -X GET "https://api.kimp360.com/some-resource" \
-H "x-api-key: YOUR_API_KEY" \
-H "Accept: application/json"
```
Header Name Case-Sensitivity \
While HTTP header names are generally case-insensitive according to RFC 2616, it is best practice to use the exact casing **x-api-key** as specified in the documentation to avoid potential issues with intermediaries or server configurations.
## 🛡️ Security Best Practices for API Keys
Proper management of your API keys is critical for the security of your integration and data.
Treat your API keys like passwords. Do not embed them in publicly accessible code, such as client-side JavaScript or mobile apps that can be decompiled.
Store API keys in environment variables on your server. This prevents them from being hardcoded into your application source code.
Periodically regenerate your API keys, especially if you suspect a key might have been compromised or if an employee with access leaves your organization.
If your application involves a backend server making API calls on behalf of users, ensure that server is well-secured to protect the API keys stored there.
## Troubleshooting Authentication Errors
If you encounter authentication problems, you'll typically receive a `401 Unauthorized` or `403 Forbidden` HTTP status code.
**Meaning**: The request lacks valid authentication credentials. **Possible Causes**: \* API key is missing from the `x-api-key` header. \* API key is incorrect or has a typo. \* API key has been revoked or has expired. \* The `x-api-key` header is misspelled or has incorrect casing (though less common). **Troubleshooting Steps**: 1. Verify the `x-api-key` header is present in your request. 2. Double-check that the API key value is copied correctly, without extra spaces or characters. 3. Ensure the API key is active and has not been disabled in your KIMP360 dashboard. 4. If you recently regenerated the key, ensure you are using the new one.
**Meaning**: You are authenticated, but you do not have permission to access the requested resource or perform the requested action. **Possible Causes**: \* The API key used has insufficient permissions for the target resource or action (if granular permissions are supported). \* You are trying to access a resource that does not belong to your account or project. **Troubleshooting Steps**: 1. Check the permissions associated with the API key in your KIMP360 dashboard (if applicable). 2. Ensure you are targeting the correct resource ID and that it belongs to the account associated with your API key.
If you continue to experience issues, please refer to our general [API Error Handling](/endpoints/error-handling) guide or contact [support@kimp360.com](mailto:support@kimp360.com) with details of your request and the error received.
In the **Zapier Integration** tab, you can generate a new API key or view your existing key. If you generate a new key, you may be asked to name it for easy identification (for example, **“KIMP API Key”**).
Once your API key is displayed, copy it and store it in a secure location, such as a password manager or a secure environment variable for your application.
Important: Secure Your Key! \
Your API key grants access to your KIMP360 data and resources. Never share it publicly, embed it directly in client-side code (such as JavaScript in a browser), or commit it to version control (for example, Git).
## Making Authenticated Requests
To authenticate an API request, you must include your API key in the **x-api-key** HTTP header.
**Example Request Header:**
```http theme={null}
x-api-key: YOUR_API_KEY
```
Replace `YOUR_API_KEY` with the actual API key you obtained.
**Full Example using cURL:**
```bash theme={null}
curl -X GET "https://api.kimp360.com/some-resource" \
-H "x-api-key: YOUR_API_KEY" \
-H "Accept: application/json"
```
Header Name Case-Sensitivity \
While HTTP header names are generally case-insensitive according to RFC 2616, it is best practice to use the exact casing **x-api-key** as specified in the documentation to avoid potential issues with intermediaries or server configurations.
## 🛡️ Security Best Practices for API Keys
Proper management of your API keys is critical for the security of your integration and data.
Treat your API keys like passwords. Do not embed them in publicly accessible code, such as client-side JavaScript or mobile apps that can be decompiled.
Store API keys in environment variables on your server. This prevents them from being hardcoded into your application source code.
Periodically regenerate your API keys, especially if you suspect a key might have been compromised or if an employee with access leaves your organization.
If your application involves a backend server making API calls on behalf of users, ensure that server is well-secured to protect the API keys stored there.
## Troubleshooting Authentication Errors
If you encounter authentication problems, you'll typically receive a `401 Unauthorized` or `403 Forbidden` HTTP status code.
**Meaning**: The request lacks valid authentication credentials. **Possible Causes**: \* API key is missing from the `x-api-key` header. \* API key is incorrect or has a typo. \* API key has been revoked or has expired. \* The `x-api-key` header is misspelled or has incorrect casing (though less common). **Troubleshooting Steps**: 1. Verify the `x-api-key` header is present in your request. 2. Double-check that the API key value is copied correctly, without extra spaces or characters. 3. Ensure the API key is active and has not been disabled in your KIMP360 dashboard. 4. If you recently regenerated the key, ensure you are using the new one.
**Meaning**: You are authenticated, but you do not have permission to access the requested resource or perform the requested action. **Possible Causes**: \* The API key used has insufficient permissions for the target resource or action (if granular permissions are supported). \* You are trying to access a resource that does not belong to your account or project. **Troubleshooting Steps**: 1. Check the permissions associated with the API key in your KIMP360 dashboard (if applicable). 2. Ensure you are targeting the correct resource ID and that it belongs to the account associated with your API key.
If you continue to experience issues, please refer to our general [API Error Handling](/endpoints/error-handling) guide or contact [support@kimp360.com](mailto:support@kimp360.com) with details of your request and the error received.